In this example I will install the Network Policy Server to support
RADIUS on a Windows 2008 R2 domain controller and give router login
access to an Active Directory domain user.
First go into Server Manager.

Highlight Roles on the left side, then in the Role Summary section click Add Roles on the far right.

When you reach the Select Server Roles screen, check Network Policy and Access Services. Click
Next.

Check Network Policy Server only, then click Next. Then click Install and and confirm the install was successful.
Now go to Start > Admin Tools > Network Policy Server.

In the left pane open up Policies, then right click Network Policies and select New from the menu.

Type a name for the new login policy, leave the network access server type at Unspecified and click Next.

Click Add to add the conditions necessary for this network policy to be run.

We will specify that this policy is run for users in a specific Windows group, so highlight Windows Group and click Add.

Click Add Groups.

Type the name of the user group that you want to grant Cisco login
access to. I will give this access to my Domain Admins. Click Check
Names to verify, then click OK.

Click OK.

Optionally we can specify that this network policy will apply to a specific RADIUS client (i.e. Cisco router). click Add.

Select Client Friendly Name, click Add.

Type a friendly name for your router. As it says you can use pattern
matching such as a wildcard (*) if desired for this to apply to multiple
devices. Click OK.

Now we click Next.

If the policy conditions are matched we want to provide access so select “Access granted” and click Next.

The Cisco IOS requires unencrypted authentication methods so select “Unencrypted authentication (PAP, SPAP)”. Click Next.

We get a warning about selecting the unencrypted authentication type, click No unless you want to do some reading.

We can set additional constraints to match for the policy to apply. Just click Next.

This policy will apply to router logins only so we’ll specify an
attribute to identify this connection type. Highlight Standard under
RADIUS Attributes and in the right side and delete both attributes that
are already there. Then click Add.

With Access type set to All select the Service-Type attribute, then click Add.

Under Attribute Value select Others, then select Login from the menu. Click OK.

Click Close.

This next attribute setting is optional but often configured to allow
users to automatically have their privileges elevated to privileged (15)
EXEC mode when they login to the Cisco router. Under RADIUS Attributes
select Vendor Specific. Click Add.

With Vendor set to “All”, select Vendor-Specific for the attribute and click Add.

Click Add.

For the attribute information select “Select from list” and choose Cisco
from the menu. Then select “Yes. It conforms” and click Configure
Attribute.
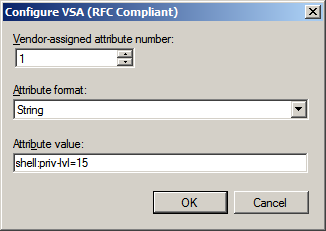
For the Vendor-assigned attribute number enter 1, for Attribute format choose String, and in Attribute value type:
shell:priv-lvl=15
Then click OK.

Click OK.

Click Close.

Click Next.

Finally click Finish.

Now we need to specify the Cisco router as a RADIUS client to the
Windows NPS server. Back at the Network Policy Server console in the
left open up RADIUS Clients and Servers, then right click RADIUS Clients
and choose New from the menu

In the New RADIUS Client dialog type the friendly name that you
specified earlier in the network policy for this router. Enter the IP
address for the device, use the IP of the router interface closest to
the Windows server or use the IP of the interface that you specified if
you used the “ip radius” command when configuring the Cisco device.
Finally enter the shared secret RADIUS key that you specified over on
the router. Now click OK.

Now the NPS service needs to be activated in Active Directory. Right
click the NPS tree root on the left pane, and choose “Register server in
Active Directory”.

Click OK.

Click OK again.
Finally I have noticed that NPS doesn’t seem to work after all this
configuration until I’ve restarted the service. So once again on the
NPS tree root right click it and select “Stop NPS Service”. It seems to
take a few moments for the service to actually stop so wait 10-15
seconds then right click NPS again and choose “Start NPS Service”.
Switch over to your router and make an attempt to login.
One thing to keep in mind with these Network Policies in NPS is that
some of their settings can be overridden by Connection Request
Policies. Daryl Hunter noted this in his blog on the subject, so keep this in mind of you have any difficulties. Hope all goes well!
References
No comments:
Post a Comment